This post will show how to make a daemon with Python that will leverage Suricata alerts to block IP addresses.
Here is a look at the full code for the daemon, called ‘alert_daemon.py’:

Now I will break down each section.
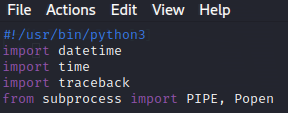
This first line is the pointer to the Python interpreter. The rest are the libraries we want to import.

This block is the command line function. It defines a function that allows us to run normal Linux terminal commands in our Python code.
For the last section, we have a while loop that is using while True. This is usually a risky way to use a while loop because the function will keep looping back indefinitely and can cause issues if errors occur. We want this function to run continuously, so to counter any errors, we will use try/except statements. The ‘except’ block should stop the loop if errors occur.
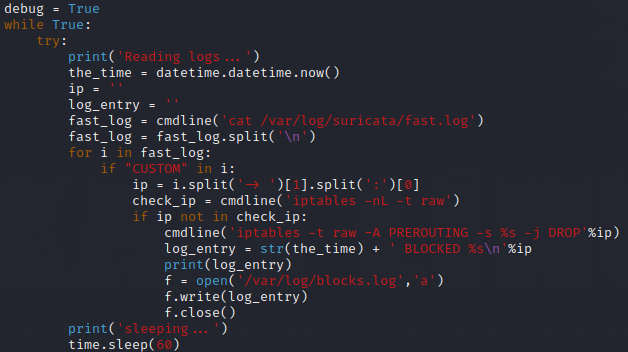
Here is the ‘try’ statement. The debug = True before the while loop starts is for the ‘except’ statement later on.
First we define a few variables. The fast_log variable is our first use of the command line function. This lets us assign the contents of the fast.log file created by Suricata to the fast_log variable. Next, we split the fast_log at each new line with fast_log.split('\n') so each alert entry in fast.log is its own line.
From here, we will iterate through each line in the fast_log with a ‘for’ loop looking for “CUSTOM”. The IP addresses we want to block are the ones that generate alerts from our custom rule. Since we included “CUSTOM” in the alert message, this is a good way to make sure those are the only addresses that get blocked.
To extract the IP address from the alert message, we can utilize the ‘.split’ function again. First we split at the ‘-> ‘ (the right arrow and the space after it) to get a list with everything highlighted yellow in position [0] and everything blue in position [1].

We then take position [1] and split again at the colon to get the IP address (highlighted green) in position [0] and the port (highlighted orange) in position [1]. We take position [0] and assign it to variable ‘ip’.

Now we need to check if the IP we just got is already in our firewall. We will make a ‘check_ip’ variable by using the command line function and use the ‘iptables’ command with the arguments iptables -nL -t raw. With the ‘if’ statement if ip not in check_ip, if the Ip address is NOT already in ‘check_ip’, it will get added.
To add the IP to the firewall, we use the command line function:
cmdline('iptables -t raw -A PREROUTING -s %s -j DROP'%ip)The ‘%s’ will get replaced with the IP address, and now it is being blocked. The next lines are there to make a log entry that says the IP is blocked and at what time it occurred. Then a file ‘blocks.log’ is created and the entry is added to it.
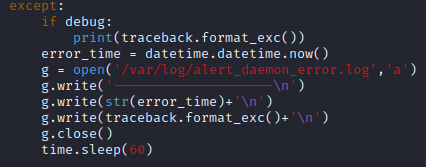
Now the ‘except’ statement. Since we set ‘debug = True’ earlier, the ‘except’ block will trigger if something goes wrong during the ‘try’ block. All this is doing is recording errors and writing them to the ‘alert_daemon_error.log’ file and including the traceback format to help with troubleshooting.
To automate this program, we can use Supervisor. First we need a ‘.conf’ file in the etc/supervisor/conf.d directory. I will call it ‘alert_daemon.conf’.

The program name is ‘alert’ and the command has the file path to the ‘alert_daemon.py’ file.
The next step is to use the ‘service’ function to activate Supervisor:
service supervisor start
service supervisor status
Check the status to make sure it is running.
Now with ‘supervisorctl’ we can check the status of the alert daemon:

If for any reason the daemon stops running or you want it to stop running, ‘supervisorctl’ allows you to stop, start, restart, and check the status of the daemon.